Category Archives: Uncategorized

Maple Butternut Squash & Roasted Brussels Sprouts

}
Maple Butternut Squash, Roasted Brussels Sprouts, Pumpkin Seeds, and Cranberries – a perfect Autumn or Winter side dish, bursting with colors and flavors! Healthy, delicious, gluten free recipe packed with veggies.

Ingredients

  • 3 cups Brussels sprouts, ends trimmed, yellow leaves removed
  • 3 tablespoons olive oil
  • Salt to taste
  • 1 1/2 lb butternut squash peeled, seeded, and cubed into 1-inch cubes (Yields about 4 cups of uncooked cubed butternut squash)
  • 2 tablespoons olive oil
  • 3 tablespoons maple syrup
  • ½ teaspoon ground cinnamon
  • 1/2 cup pumpkin seeds
  • 1 cup dried cranberries
  • 2-4 tablespoons maple syrup optional

Instructions

Roasted Brussels sprouts:

  1. Preheat oven to 400 F. Lightly grease the foil-lined baking sheet with 1 tablespoon of olive oil.
  2. Make sure Brussels sprouts have trimmed ends and yellow leaves are removed. Then, slice all Brussels sprouts in half. In a medium bowl, combine halved Brussels sprouts, 2 tablespoons of olive oil, salt (to taste), and toss to combine. Place onto a foil-lined baking sheet, cut side down, and roast in the oven at 400 F for about 20-25 minutes. During the last 5-10 minutes of roasting, turn them over for even browning, the cut sides should be nicely and partially charred but not blackened.

Roasted butternut squash:

  1. Preheat oven to 400 F. Lightly grease the foil-lined baking sheet with 1 tablespoon of olive oil.
  2. In a medium bowl, combine cubed butternut squash (peeled and seeded),1 tablespoon of olive oil, maple syrup, and cinnamon, and toss to mix.
  3. Place butternut squash in a single layer on the baking sheet. Bake for 20-25 minutes, turning once half-way through baking, until softened.
  4. Note: You can roast both Brussels sprouts and butternut squash on 2 separate baking sheets at the same time, on the same rack in the oven.

Assembly:

  1. In a large bowl, combine roasted Brussels sprouts, roasted butternut squash, pumpkin seeds, and cranberries, and mix to combine. (OPTIONAL): For more sweetness, add 2 or 4 tablespoons of maple syrup, if desired – do not add all maple syrup at once, start with 2 tablespoons, then add more, if desired, and toss with the ingredients to combine.

My Mom’s Coffee Cake

If you are reading this on April 7th, today is National Coffee Cake Day. Funny how memories of childhood pop up at the most interesting times. My niece asked this morning if I had a good coffee cake recipe, so I sent her Mom’s. What a great way for her to remember her grandmother.

This coffee cake defines “simple.” Mom had me making it by the time I was 10. Not complicated, not too sweet, and perfect for a quick family morning surprise, this cake has few ingredients, so gather them up and let’s get baking!

I don’t usually bake. I don’t usually use sugar, or white flour for that matter, but I truly believe “less is more,” so a rare trip down memory lane isn’t bad, as long a someone will help you eat this pan of deliciousness. I quite honestly can’t say if it freezes well as I’ve never had it last more than a few hours.

Equipment:

  • 9×9 baking pan
  • small mixing bowl
  • medium mixing bowl
  • wooden spoon or rubber spatula
  • small, microwavable dish

Ingredients:

  • 2 cups flour
  • 1/2 teaspoon salt
  • 2 teaspoons baking powder
  • 1/2 cup sugar
  • 1 egg
  • 1 Tablespoon melted butter
  • 1 cup milk (I use skim; use what you have)
  • 2 Tablespoons sugar
  • 2 teaspoons ground cinnamon

Directions:

Preheat oven to 350 F. Sift dry ingredients (except for the 2 Tablespoons sugar and 2 teaspoons cinnamon-that comes later) in a medium mixing bowl. Melt butter in a small, microwavable dish (cover it so it doesn’t explode in your microwave). In a small mixing bowl, whisk egg and milk together. Add melted butter. Add wet ingredients to dry ingredients and mix gently with a wooden spoon or rubber spatula until totally mixed. Pour into prepared 9×9 baking dish and spread evenly.

Mix additional 2 Tablespoons sugar and 2 teaspoons ground cinnamon in a small bowl. Sprinkle evenly over top of batter in pan.

Bake in a preheated 350F oven for 25 to30 minutes until top is crispy and toothpick comes out clean.

Cool slightly before cutting a big slice and slathering it with butter. Enjoy!

Stuffed Poblanos

This image has an empty alt attribute; its file name is Stuffed-Poblanos-1.jpg

OK, it’s time to cook, again. Here’s a quick dish that can serve as dinner for four hungry adults, or make dinner for two with leftovers (and who doesn’t love leftovers)! Add some cubed chicken, make it vegetarian, use up that leftover cooked sausage. Whatever you choose… let your creativity shine.

Assemble this up to a day ahead and refrigerate until ready to put it in the oven. If this goes into the oven cold, remember it will take 5 to 10 minutes longer to cook.

Poblanos are wonderful peppers, flavorful, not too hot, but then again, not too bland, either. Choose nice, blocky peppers, about 4 to 5 inches long, firm, dark and shiny. Steam them whole and then (with gloved hands) remove the stems, seeds and membrane.

I chose low fat cheeses but you can use the cheese of your choice. Fat free cheeses will not melt, and fat free cream cheese will cause the filling to be watery. If your spice cabinet seems a little weak, now is the time to add some Mexican or Southwest seasonings.

Stuffed Poblano Peppers

Each pepper is one BIG serving. They can be frozen in individual freezer containers. Label and date.

Ingredients (for 4 servings)

  • 4 large poblano peppers, washed
  • 2 cups cooked brown rice
  • 1 can black beans, drained and thoroughly rinsed
  • 2 ears sweet corn, kernels removed (or 1 cup frozen corn kernels)
  • 8 ounces low fat (neufchatel) cream cheese
  • 1 15-ounce can diced tomatoes, drained
  • 1 small can mild green chilies, diced
  • 1 cup plus 1/2 cup shredded Mexican-blend cheese (low fat)
  • 2 teaspoons ground cumin
  • 1 teaspoon any kind of chili powder (regular, Aleppo, Chipotle)
  • 1/2 cup fresh cilantro, chopped
  • Low fat sour cream or plain fat free Greek yogurt (for topping just before serving)

Equipment needed

  • A pot, with a lid, large enough to hold all poblanos
  • 3 quart pan with lid to cook rice
  • Measuring cups and spoons
  • Can opener
  • Mesh strainer
  • Rubber kitchen gloves
  • A small paring knife
  • A large mixing bowl
  • Small microwave-safe bowl
  • Small cutting board
  • Chef knife
  • Oven-proof 7×11 (or larger) dish

Directions

  • Fill pot with enough water to go ½ way up peppers. Bring water to a boil. Add peppers, cover with lid and boil for 5 minutes. Using tongs, remove peppers from water and place on a plate.
  • Using rubber gloves (kitchen or surgical), slit peppers, using a paring knife, one at a time, down the side. Remove stems, seeds and membrane and discard. Place peppers in an oven-proof glass or stone dish.
  • Cook rice or use rice prepared at another time. Place in a large mixing bowl.
  • Using a small paring knife, remove corn kernels from cob and place kernels in mixing bowl.
  • Drain and rinse black beans. Place in mixing bowl.
  • Remove cream cheese from package. In a small microwavable bowl, microwave cream cheese on full power for about 30 seconds, until soft enough to mix in with other ingredients. Add to mixing bowl and squish around with all the other ingredients.
  • Add drained, diced tomatoes, 1 cup of shredded cheese, cumin, chili powder and cilantro. Mix well.
  • Stuff each pepper. Make them fat. Surround the peppers with the filling that wouldn’t fit inside the peppers. Sprinkle remaining ½ cup shredded cheese on top.

At this point, the peppers look like a casserole and are ready to go into the oven. (You can put them in the refrigerator and bake them later. If they go into the oven cold, you may have to bake them about 5 minutes longer.)

  • Bake in 350º oven for 20-30 minutes, until filling starts to bubble.

Serve with sour cream or Greek yogurt. Ta Da!

This image has an empty alt attribute; its file name is Stuffed-Poblanos-1.jpg


Garlic-Cheese Asparagus

Some day, we’ll look back on this and wonder “Why such a small lunch?” At the moment, we are all staying home due to the covid-19 pandemic. If you are the parent in a family unit, your normal day probably includes giving your children a quick breakfast, sending them off to school or daycare, kissing your spouse good-bye and heading off to work. The end of a long day might include picking up some take-out on the way home or tossing a frozen pizza in the oven.

NOW, everyone is at home. The kids look in the refrigerator every 15 minutes or, if no children, your spouse looks hopefully at you at about 11:45 and says “What’s for lunch?”

Lunch? I have to cook in the middle of the day? I’m still in my pajamas! Now is the time to try some new recipes, and the one in the above photo looks fancy, tastes fabulous and is SO easy.

Go in search of some new recipes. I found this one in the HyVee “Seasons” magazine, and I simply adapted it to fit what I had on hand and just for two people. Thanks, HyVee!

Use the kind of cheeses you have. Don’t have Italian seasoning? Use some dried oregano and basil, maybe some fennel, a little rosemary.

Garlic Cheese Asparagus
  • Non-stick cooking spray
  • 3/4 pound fresh asparagus spears, trimmed
  • 1 Tablespoon olive oil
  • 2 cloves garlic, minced
  • 1 teaspoon Italian seasoning
  • Kosher salt to taste
  • Fresh ground black pepper to taste
  • 1 ounce shredded cheddar cheese
  • 1/2 teaspoon all-purpose flour
  • 1/4 cup reduced fat or non fat milk
  • 1 ounce low-fat cream cheese
  • 1/4 cup shredded Parmesan cheese
  • 1 or 2 Tablespoons crushed croutons

Preheat oven to 400 degrees. Spray a 7 x 11 baking dish with non-stick spray. Spread trimmed asparagus in a single layer in dish.

In a small bowl, combine olive oil, minced garlic, Italian seasoning, salt and pepper. Brush oil mixture over asparagus. Roast for 10 minutes, or until asparagus is crisp tender. Remove dish from oven. Preheat broiler to HI.

For sauce, toss together cheddar cheese and flour; set aside. Bring milk to a simmer in a small saucepan. Whisk in cream cheese. Add Cheddar cheese mixture. Cook and stir over low heat until cheese are melted and sauce is slightly thickened.

Spoon cheese sauce over asparagus. Sprinkle Parmesan cheese on top. Broil for 4 to 5 minutes or until golden brown (don’t walk away!). Remove from oven. Sprinkle with croutons and, if desired, some kind of fresh green herb.

This image has an empty alt attribute; its file name is plated-asparagus-1.jpg

Hummus

hummus and veggiesTonight will be one of those rather relaxed evenings at our house. The day has been sort of uneventful…OK, boring. Appetizers for dinner! That would fun! A board game! A movie! AND it’s only Thursday!!!

I roasted a rather large chicken Monday and have been rather creative at using leftovers to make tasty meals this week, but enough is enough! I chopped up the rest of that bird this afternoon and tossed it in the freezer for soup day. No chicken will be used in the making of these appetizers, BUT chick peas sound good. Hummus!

If you’ve never had hummus, it’s a tasty “dip” of Mediterranean origin that is high in protein and is available in most larger grocery stores, in the produce area where you find fresh salsas and dips. You can easily make it at home and create any “flavor” with just a few added ingredients, and it goes together in less than 10 minutes in your kitchen. Use it as a spread on little toasted pita pieces, dip veggies or baked taco chips. Add roasted peppers, olives, herbs, garlic, onions. Or keep it rather simple. The only “weird” ingredient, if you live in a small town, is tahini, which is a paste (like peanut butter) made out of sesame seeds. I found it in our little store, waiting patiently in the health food section. A jar lasts a long time in the refrigerator and you only use a few tablespoons at a time, so don’t panic over the price. You can also make hummus without tahini and the flavor won’t be too far off the real stuff.

Ready for some fun? Here we go…

Roasted Red Pepper Hummus

Equipment you will need:
Food processor with “s” blade (the one that finely chops stuff)
Rubber spatula
spoons for tasting
cutting board
chef knife

Ingredients:
1 roasted red pepper, peeled and seeded
2 cans garbanzo beans (chick peas), drained and rinsed
3 cloves garlic (Peel them and place them on a cutting board. Smash them with the side of a chef knife. Chop them up a little and they are good to go)
2 Tablespoons tahini (sesame seed paste)
1 teaspoon salt (or more, depending on taste)
¼ teaspoon white pepper
Juice of ½ lemon
Extra virgin olive oil (¼ cup or more)

Directions:
Roast a red pepper. Easy Peasy. See directions at the bottom of this recipe.
Drain and rinse the garbanzo beans. Toss into the food processor. Add everything but the olive oil. Pulse a few times to get everything chopped.hummus stuff in processor
With the food processor on, slowly pour olive oil into the little hole where oil goes (or down the chute). Keep adding oil, stopping occasionally to scrape the sides so everything gets well blended. Patience is a virtue! Keep processing until you have a nice, smooth paste. You will probably process for about 5 minutes. If mixture seems dry, add a little more oil. That’s it. You have hummus! Store it in a hummus smooth in processorsealed container in the refrigerator. It keeps for several days. Be creative. Add fresh herbs, sun-dried tomatoes, kalmata olives. Hummus tastes great with baby carrots, zucchini strips, pita chips, cucumbers, or whatever you like to dip.

How to Roast a Red Pepper:
Place a clean, raw red pepper over an open flame, i. e. outdoor grill, on burner of gas stove, blow torch…Using tongs, rotate the pepper until the entire pepper is charred and black. Turn off flame and toss pepper into a Ziploc bag. Seal bag and allow to steam until pepper is cool.
Hold charred pepper under running water and peel off black skin. Break open pepper and remove seeds and stem. Ta Da! Roasted red pepper. When red peppers are on sale, I buy lots of them, grill them all. Cool them, peel them and cut them into chunks. Then they go into snack-sized baggies and get tossed into the freezer until I need them. Much cheaper than buying jars of roasted peppers that are packed in oil and loaded with salt.

Makin’ Green…Salad, That Is

Kale salad with sliced strawberryA friend called me up last night and said “Where did you find that really green lettuce you used in the photo I just saw?”

It’s kale, folks. Don’t make that noise until you give it a chance. Many people mistake kale for some kind of lettuce, when it is actually a member of the cabbage family. It is loaded with nutrients not found in lettuces, and can be used in soups, stir frys, and great salads. You can find the nutritional scoop on kale at http://authoritynutrition.com/10-proven-benefits-of-kale/.     Lately, we’ve been making quick, end-of-the-day salads using kale, any kind of fresh berries, a slight blessing of nuts or seeds and a drizzle of homemade vinaigrette.

So here’s the info on this pretty salad. Buy some kale, clean it and store it in a zippered bag. Keep some berries in your frig. Have some nuts stashed in a cupboard. The salad in this picture even has some avocado slices. Sliced fresh peaches would be good. Be creative! And how do you get those strawberries to look so pretty? Easy peasy.

Find a nice sized strawberry with it’s green top intact. Use a cutting board and a REALLY sharp, thin bladed paring knife. Stand that berry on its green top. Starting on one side, carefully slice down the berry, almost to the board. Continue making slow, careful slices until the whole berry has been sliced. Be careful not to slice all the way to the top (green cap) of the berry. When done, fan out the berry and set it on the side of the salad (or the dinner plate, or the kids’ oatmeal bowl, even next to that omelet). You CAN make meals look fancy.

The dressing? In a small bowl, whisk together 2 Tablespoons of balsamic vinegar, 1 Tablespoon olive oil, a pinch of Kosher salt, one grind of pepper and a little drip of honey. Whisk all ingredients together until they emulsify (your new culinary word for the day…all the ingredients mix together so well that they look almost creamy and don’t separate). This should make enough for at least two salads. Remember, we’re dressing this salad, not burying it. You could use any vinegar instead of balsamic. Experiment with canola oil. I have a ginger/sesame infused olive oil that I pull out on occasion. No need to buy bottle after bottle of prepared salad dressings. You can make this in less than two minutes.


Kitchen Gadgets to Love

grill panOver the years, this foodie has collected quite an assortment of kitchen gadgets. Some of them sit in a drawer or a box for years and eventually go to a garage sale. Then there are a few that get used over and over.

Emeril Lagasse once said that a good cook doesn’t need tons of gadgets, just a really good knife and hands. That may be true, but it’s still fun to head for the Pampered Chef party or stroll through the kitchen store and see all the kitchen wonders that we can’t live without. I love my egg slicer, but the jury is still out on that pineapple corer/slicer. BUT my favorite is the stove top grill pan.

My first grill pan (which still gets used) covers two burners of my gas stove. It is two-sided; one side is a flat griddle and the other grooved for meats and veggies. Here in the cold upper Midwest, outdoor grilling season ends way too soon, so hooray for the indoor grill. BUT my favorite, because we are generally a household of two people, is the square grill pan. It fits on just one burner, has a handle, and gets used at our house several times a week.

I had looked at one of these for months and balked at the $50-$130 range. Then I found one at a T.J. maxx for only $29.99! It’s even the brand I love. Calphalon. It just doesn’t have a handle that matches my other pans. Don’t care…it works!

So, how would I use this wonder pan, you ask? Before heading off to work, toss some chicken breasts into a Ziploc bag with some fat-free Italian dressing and store them in the refrigerator. At dinner time, heat your grill pan over medium heat. Grill the chicken breasts until done. If they are thick, cover them with a piece of foil after turning them over to force the heat down into the meat. While they are cooking, whip up a salad. You could even grill some asparagus or fresh green beans (or some pineapple that you cored and sliced with that other gadget).

I’ve used it to grill peaches and plums that I serve with vanilla yogurt. Shrimp on skewers, YES! Steak kabobs, yum. I highly recommend that you add this gadget to your collection. It won’t get dusty!

Soup Day!

Chicken SoupQuestion…When you think of soup, do you think of Winter? At the restaurant, we serve soup every day of the year, and it never seems to fall out of popularity. Soup fills us up, it is satisfying and many times is a lower calorie alternative to whatever it was that we considered eating in the first place.

Ahhh! Soup. I can smell it now. Soups can take on any personality you choose; bold and spicy like chili, beef vegetable with those wonderful textures and little bursts of flavor, creamy tomato or a spicy roasted vegetable concoction, blended to silk with an immersion blender. Soups can be hearty and overflowing with meat, vegetarian with lentils and other legumes, creamy, brothy, or made from leftovers that wait patiently in your refrigerator to come out and be useful. So let’s make some soup today!

Today, I’m making 2 gallons of soup for a church supper, so as long as I’m using a large pot, I might as well make more to freeze for our household. That’s what is great about soup, you can make as much as you want. If you are home for several hours you can make a chicken soup from scratch. Start with a nice, plump WHOLE chicken, some chunks of carrot, celery (use the tops and leaves of the stock) and chopped onion. OR, use that leftover chicken from Sunday and make a smaller batch.

Do you think you are a “non-cook?” Well, soup is not rocket science. Find a good basic recipe to follow the first time, and from there you can learn to be creative. Here’s a good way to make chicken noodle soup. Watch out for the salt. If anything, be a little stingy. You can always add more later. Are you ready to make your house smell wonderful? It might seem like it takes a lot of time to make soup. Well, it does, but you don’t have to stand in the kitchen while that chicken is cooking. Go read a book or take a nap. Here we go…
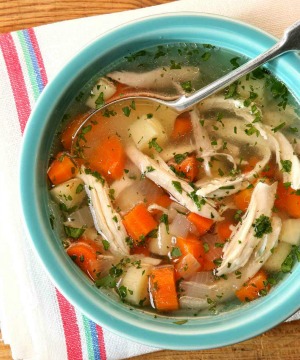
Chicken Noodle Soup
Makes about 2 gallons soup

1 Tablespoon olive oil
1 onion, chopped
2 cups carrots, diced (wash, but no need to peel)
2 cups diced celery (use the tops and leaves, too)
salt and pepper
3 or 4 cloves garlic, chopped
1 whole chicken (about 4 pounds), cut into quarters for easier handling
water to cover chicken

In a LARGE pot over medium heat, heat olive oil. Add onion, carrots, celery and salt and pepper. Saute until onions are tender (about 7 minutes. Add garlic and saute about 1 more minute. Add chicken. Add enough water to cover the chicken plus about 1 inch. Raise heat to high and bring to a boil. When water begins to boil, reduce heat to maintain a simmer and continue cooking until chicken is “fall off the bone” tender, about 1 and a half hours. Turn off heat.

When chicken is done, set another large pot next to the first one. Place a large strainer over the clean pot. Using tongs, remove as many chicken pieces as you can and place in strainer. After chicken has drained, place the chicken in a large bowl to cool (it’s hard to handle chicken when it is burning your fingers). Now, using potholders, carefully pour the remaining liquid, veggies and chicken scraps into the strainer, letting all the broth pour into the pot. Pick through the veggies to find the chicken that’s hiding in there and put it in the bowl with the rest of the chicken. Throw out the veggies. Yup, toss ’em. They have done their job of flavoring that lovely stock, but they are full of chicken fat. Refrigerate the broth (stock) that you’ve just strained until it is chilled and the fat rises to the top (several hours). When the fat coats the top, skim it off and discard the fat. Now you have a beautiful stock for your soup.

Remove the cooled chicken from the bones. Discard the bones and skin. Chop chicken into bite-sized pieces.

Next step, assemble the soup: This sounds like we are starting over…
1 Tablespoon olive oil
1 onion, chopped
1 pound carrots, diced, peel this batch
2 cups diced celery
salt and pepper
3 or 4 cloves garlic, chopped

You can cut up these vegetables while the chicken is cooking and set them aside until needed.
Just like when you were starting the chicken process, saute the above veggies, except for the garlic, in that large pot that you just cleaned out from cooking the chicken. When onions are tender, place garlic in and saute for another minute until fragrant. Add “defatted” stock to veggies. Add:
½ cup dried parsley flakes
½ teaspoon ground pepper
1 teaspoon thyme
(do not add any salt until later. The stock will be salty from cooking the chicken)
Add the chicken back into the stock. Add enough water to make about 1 ½ gallons broth. Bring to a simmer. Simmer for about 30 minutes so all the flavors blend. Bring to a boil. When boiling, add one or two packages of noodles. Cook according to directions on noodle package, in the chicken soup stock,  until noodles are almost done. Turn off heat. Cover pot. Noodles will continue to cook as they sit in the soup. Allow all the ingredients to party until the flavors are blended. Add salt if necessary.

Eat some, freeze some. Enjoy!


Kitchen Lifesavers

Here’s a rather personal question: What kind of foods do you keep in your cupboards and refrigerator? Do  you have those “go to” items that you keep on hand so you can whip up a meal in no time flat?

Chicken-Salad

My favorites have changed over the years. I’ve found lots of extra space by tossing those items I tried and vowed never to use again. Sugar-free acai salad dressing with wine vinegar? Kalmata bruschetta topping (tasted like sour paste). We all have them. Admit it. Toss them out and move on. BUT, it never hurts to try new foods. Just make sure you read the labels. Google those ingredients. The more processed the food, the longer the list. Some of those ingredients are naturally occurring, but some are pure chemical. Educate yourself. I discovered that bottled lemon juice has sodium bisulfite in the ingredients list. Fine for most people, but it makes me miserable. Real lemons, those pretty yellow gems, are great AND every one of them comes with free lemon zest! Buy them on sale, zest them and freeze the zest, then freeze some juice in little containers. Just make sure to label them so you don’t wonder a few weeks later what on earth this could possibly be.

So what would you find in my cupboards and refrigerator? First, I love to make salads and dressings, so I keep good olive oil, several types of vinegar, including red wine, apple cider, a good quality balsamic, some citrus fruit, honey, and a wire whisk. Then there are nuts, like pistachios, walnuts, pecans (in containers, out of my line of sight to keep my little hands from unplanned snack-grabbing), fresh berries, kale and lettuces, plus other salad veggies like cucumbers, tomatoes, peppers and onions.

What to make for dinner tonight? How about a great salad. Leftover chicken, some water-packed tuna (or a piece of seared ahi tuna), shrimp, salmon, plus great salad fixings make a dinner feast. If you have the right “stuff” on hand, dinner will be ready in minutes!

Want to know what else I keep on hand? Stay tuned for more.


The Better Burger

Turkey burgerWeekends always seem to bring about more relaxed eating, but relaxing doesn’t mean letting the whole healthy eating plan fall to pieces. Hamburgers are my first go-to for casual fare, but since our household tries to follow the Weight Watchers plan, one of those fast food wonders can pack  up to FORTY points. Come on, people. I only get 30 points a day.

But wait…there’s a way. It’s called the Turkey Burger. The best restaurant turkey burger I ever had was at the Yard House in Phoenix. Fabulous. Sort of like turkey meatloaf on a bun. I still drool thinking about it. Yummy, but probably not the healthiest burger. Why, because not all ground turkey is created equal. Never fear! You can make your own yummy burger.

Plan ahead for those weekend burger fests. Buy ground turkey that is labeled 93% lean. Check the nutritional labeling. No more than 7% fat. Look at the ingredients list. Make sure this is turkey, not a package of fillers and chemicals. Real turkey! Ready? Here we go!

Each Burger patty, with cheese, 6 PointsPlus

The Ultimate Turkey Burger
16 ounces ground turkey, 93% lean, uncooked
10 saltines (2 ounces), crushed
1 egg
1 Tablespoon ketchup
1 teaspoon yellow mustard
2 Tablespoons dehydrated onion flakes
1 teaspoon garlic powder
1 teaspoon cumin
salt and pepper
4 slices (1 ounce each) light Swiss cheese 4 points

In a medium mixing bowl, combine all ingredients, except cheese, until well mixed (I put on surgical gloves so I don’t get stuff under my nails).

Divide mixture into 4 equal patties. Grill on a grill pan until each patty reaches 165°. Top each patty with a slice of cheese and heat until cheese melts.

Hint: Since patties will not shrink like beef patties, after browning patties on both sides, cover with foil to force heat into the patties. They will be thick.

Remove from pan. Serve on a light hamburger bun (like Village Hearth or Sara Lee) with lettuce, tomato, and pickle.

Only one of you at home? Freeze three burgers for future cravings!